Saturday, December 31, 2011
More criticism and advice on popular models hook published
In my last article we were reviewing the corrections for Herrschners Blue-Ribbon Afghans book. We will continue with those corrections. The next pattern is as follows:
Irish Trellis on page 50. The corrections to this pattern are as follows: The pattern repeat in Row 10 is 8 stitches - sk next 3 sts, tr in next st, working in front of tr just made, tr in 3 sk sts = 4 sts %2B sk next st, tr in next 3 sts. Working behind 3 tr just made, tr in sk st = 4 sts, for a total of 8 sts. 8 x 23.5 = 188 sts plus the ch-4 at the beginning and one tr at the end = 190 sts. Row 9 will end with 191 sts. To correct this, at the end of Row 9, work 2 sc together. Then in Row 12 work 2 sc in the first stitch, to return to 191 sts.
Diamonds and Rings on page 62 - Clarification of Edging on Ring Panel
Rnd 1: (RS with rs facing and working in bk lps only, join MC in and dc of first ring with sl st, ch 3 (counts as dc)
*To join half ring, place half ring under first full ring, (yo, insert hook into bk lp only of next st on full ring, then insert hook between the 13th and 14th dc of the half ring, yo, draw up lp (3 lps on hook) yo, and draw thru all 3 lps.
In this same joining st (of the full ring and the half ring) - work (3dc, hdc) - corner made. In bk lp only of the full ring only, work hdc in next st, sc in next 3 sts, hdc in next st. Insert free end of the half ring through the full ring, so first dc of the half ring is on top of the next sts of full ring. To join this end, (yo, insert hook between first and second dc of the half ring, then insert hook into bk lp only of the next st of the full ring, yo, draw up lp, (3 lps on hook) yo, and draw through all 3 lps on hook. Work (3 dc, hdc) in this same joining st (of half ring and full ring) - corner made. In full ring only, in bk lp only work hdc in next st, sc in next 2 sts, hdc in next st, dc in next st. **In next ring (second ring) work sc in next 3 sts. In next ring work dc in next st, hdc in next st, sc in next 3 sts, hdc in next st, dc in next st. Repeat from ** across to last ring. In the last ring hdc in next st, sc in next 2 sts, hdc in next st. Repeat from * for second end and up the second side to the beginning full ring. In this ring count back the last 6 sts; in first st work dc, hdc in next st, sc in next 3 sts, hdc in next st, sl st in top of beginning ch 3. Fasten off.
You will have 7 sts in side of each MC ring and 3 sts in side of each A ring. Including the corner sts (one on each end) you will have a total of 248 sts
Christmas Celebration on page 72: Assembly sequence does not match the picture. Should be Tree, Snowflake, Candy Cane, Star, Tree, Star, Candy Cane, Snowflake, Tree
Heavenly Love on page 108: Heart panel chart row 50 should be deleted, so there will be an even spacing of 2 rows between each pair of hearts. This will make the heart panel only 214 rows; when the angel panel is 215 rows. But this difference can be eased in during assembly.
Giraffes on page 110: Rows 2 - 8 say: sc in each sc across to last 2 sc; working in both lps, sc in last 5 sc. SHOULD say: sc in each sc across to last 2 sc; working in both lps, sc in last 2 sc
Giraffes on pages 112 and 113: There are two stitches missing in the body of each giraffe. In row 44, stitch #68 and stitch # 70 should be shaded gray for the LDC. This will match the giraffes in the upper row. On page 112 the upper diamond pattern should be moved up one row, to begin on row 120.
Spots And Stripes on page 126: Row 19: P6,sl 1, K2 tog, psso, *P7, rep bet *'s once, P6 (21 sts)
Filet Hearts on page 130: The number of chains in the beginning should be 184, not 185. In this filet pattern, each square of the chart equals 2 sts; either 2 dc or a ch 1 & 1 dc. To write Row 2 more specifically: (for block one) ch3, (this equals the beginning dc - but is not one of the dcs for the chart) dc in next 36 dc, (this is 2dc for each square of the chart - work one dc in each dc) For Block Two: (ch 1, sk next dc, dc in next dc) this should be 18 times for the 18 squares of the chart ----not 19
Rainbow Ripple on page 136: Row 10: Step 2: Yo, and pull through 1 lp on hook, (yo and pull through 2 lps on hook) 4 times, change to MC, (yo and pull through 2 lps on hook) 5 times, ch 1, (yo and pull through 2 lps on hook) 10 times. Row 11: Step 2: is the same; after changing color, (yo and pull through 2 lps on hook) 5 times
The above is all the corrections that Leisure Arts gave me for Blue Ribbon Afghans.
I'd like to tell you a few things about a wonderful book by House of White Birches. The book is hard cover and is called BIG BOOK of SCRAP CROCHET AFGHANS. I have made some of the afghans in this book and can tell you first hand that the patterns are wonderful and I have not found any patterns that need correction. This book has a wonderful pattern called Chapeaus. The motifs in this pattern are little hats with a different color "ribbon" woven through the brim. They are then edged in black (or to be different you can use white) for several rounds to make the motif square. then whipstitch the motifs together and you have a beautiful afghan of all different color chapeaus! I have made several of these and each one turns out different but beautiful. The book is worth purchasing just to get this pattern!
Hot-Cross Granny is a rendition of the typical granny square. Its done with a K hook and has 5 colors per granny square. The colors that were used in the pattern were TLC Essentials by Coats & Clark in white, cranberry, light country rose, country blue, dark plum, light plum, butter, medium thyme & dark thyme. The combination of these colors is really pretty.
Granny's Attic is another different granny square afghan. This one is done with 2 colors in each square - half square of the light color and the other half square done in the dark of the same color family. Lithg orange - dark orange, light blue - dark blue, light pink - dark pink, light green - dark gree, and so on. Each square is then trimmed in black. The squares are whipstitched together. STUNNING afghan!
Double Trouble is an afghan that I would think you would see in a dorm room! Its bright, garrish, zigzaggy and really different. Its done in squares of 5 or 6 bright colors in each square and the squares are trimmed in black. The pattern makes the squares look like a zigzag pattern. The afghan is whipstitched together and then trimmed in rows of color then several rows of black. Different look to this afghan, for sure!
Catty-Corners is one of the afghans that I made. It was very easy (although it looks difficult) and loads of fun to work up. Its done with various scrap colors and black, cherry red, orange, bright yellow & pale yellow. Each square is done is a log cabin style with the motif of a flower at one edge. It then gets an edging of ripples. This is a must see afghan!
Harlequin is done in strips of diamonds. First strip is black, second strip is colored. The pattern shows the colored strips in blue and green in one strip, pink and cranberry in another, orange and yellow in another and two purples in another. I made this afghan for my granddaughter and I made it with black in the first strip, turquoise in the next, then a black strip, a hot pink strip, a black strip,a lime green strip, a black strip then an orange strip then black. She just LOVES it!
There is one more crochet book I'd like to review in this article. It is...
The Best of Maggie Weldon Crochet Afghans - Leisure Arts. This book has some of the neatest afghans going! I have made several from Maggie's book! Lets look at a few of these beauties!
Lacy Squares on page 12 - Really pretty victorian style afghan that will lend charm to any room in your home. The pattern is shown in off white and is done is 8" squares that have a lacy look to them. This pattern is rated easy and from just reading though it I think it will be an easy one to accomplish. Well worth trying!
Cabbage Rose on page 20 - This is a pettern that is a join as you go but I THINK it could easily be converted to individual squares that are whipstitched together if you wish. The 11" squares and worked up in white and tan. In the center of each is a large cabbage rose with green leaves. The roses are done in lavender and pink. It is rated as an intermediate pattern.
Pineapple Rose Blossom on page 24 - A beautiful baby blanket! A basic granny square in white with tiny rosebuds of pale pink, pale blue and pale yellow in the center of every other granny square. It is edged with a gorgeous pineapple edging. This is also rated intermediate.
Daisy Afghan on page 36 - This beautiful afghan just screams summer. Done in squares of sage green with white double petaled daises with yellow centers in the center of each square. Trimmed in white. Beautiful summer blanket for your couch. Rated as easy! Looks fun to work up!
Pinwheel Rose on page 52 - I have made several of these baby blankets and each turns out a little different from the one before it. a basic granny square with a sweet rose worked into the center. It is shown in white with pale pink, pale yellow and pale blue roses. I have made it this way and also made one with all pink roses for a beautiful baby girl. This is as easy rated pattern and it is super easy and works up quickly! The pattern calls for an H hook but I used an I hook. Just like the look of it better. Also, make sure you pull the center of the flower closed before cutting your yarn.
Baby's Bunny Afghan on page 74 - This is a great pattern for those of you that like to crochet from charts. Each square is done in hdc in pink with a white lop-eared bunny worked in white. Each bunny has a white pom-pom tail. Adorable blanket. Rated intermediate.
Pretty Posies on page 80 - I made this afghan two years ago and it actually came out prettier than the picture in the book! Rated as easy and easy it is! A granny square with a posy in the center with leaves around it. Then a row of cream then a row the color of the posy then 2 more rows of cream. The pattern shows buttons sewn on the center of the posies but I did not use the buttons. I liked it better without them. The pattern is shown in cream, pink, blue, purple & Yellow with green leaves. I used winter white, cranberry, plum, dark pink and butter. Its perfectly GORGEOUS and large too!
Baby's Granny Rose on page 82 - This is an easy and quick pattern if you need a baby blanket in a hurry. Its a sweet baby afghan that measures about 42". Its actually a large granny square that has a decorative edging and tiny white roses around the edge with green leaves poking out from behind the rose petals. Its done in all white with white roses. Rated easy! I have made this one and it is quick and easy!
Victorian Ripple on page 86 - A beautiful ripple afghan that has a Victorian style edging on EACH ripple! Very different - very pretty! The pattern is shown in rose and white. Each ripple is very deep which gives elegance to the overall finished afghan. This pattern is rated intermediate. One I plan to do in the future!
Zinnia Granny on page 88 - If you like large flowers then you'll love this afghan! Rated as intermediate its done in 9" granny squares and each square has a huge pink zinnia in the middle of it. The zinnias have bright yellow centers and is bordered by dark green leaves. The granny squares are off white and each square is bordered in the same green as the leaves. Really a stunning blanket!
Country Rose on page 92 - This beauty is covered in rich red roses. Done is squares of off white the large red roses have a butter colored center. A row of red placed between the rows of off white around the squares give definition to each square. This is definitely a must try for me!
Popcorn Hexagons on page 98 - Done in white hexagons that have a lacy look to them. Each hexagon has a flower motif in the center in a different color for each hexagon. This is a join as you go afghan and is rated intermediate. Looks like a flower garden when finished!
The above patterns are just a few that are pretty simple to accomplish, even if you are a novice crocheter. Below are some tips that I have found to work over the years.
When you are making a starting ring instructions will usually tell you to chain 4 and sl st through the first ch to make a ring. I have found that it is easier to ch 4 and instead of sl stitching to make a ring; begin your first dc in the first ch. Pattern would be ch 4, 2dc in first ch, ch 2, 2 dc in same ch, ch1, 2dc in same ch, ch2, 2dc in same ch, ch1, repeat 2 more times. This would be your first round in a granny square. Makes a nice center.
When you are making granny squares and you come to the end of a round the pattern will usually tell you to ch2 or ch3 and sl st to top of first dc to complete the round. If you are continuing with another round I find it easier to do a hdc then sl st to top of the first dc. Then you can continue with the next round by making your first 3dc shell in the corner that you ended the last round in. Continue around and when you get to the end of the round do a 3dc shell in that corner and hdc and sl st to top of first dc of the first 3dc shell of that round. The overall look of the granny square is better using this technique.
Upon finishing the required amount of granny squares that a pattern call for, you now have to sew them together. There are several ways you can do this. First way is place 2 squares together, right side to right side. With a yarn needle threaded with the proper color yarn, begin in the center of the corner and go through both stitches. Bring your yarn through until you have a tail about 4 inches long. Make another stitch and pull fairly tight then your squares will be lined up pretty good. Now you just have to go through the outside loops of both squares with a whipstitch. At the end make a double whipstitch and one stitch back in toward the center a little. Cut yarn leaving a 4 or 5 inch tail. Thread the tail though the yarn needle and weave through a few stitches then back through a few more stitches. Always do this with the yarn tails to anchor them. Then cut close to squares. The second way to stitch the squares together is place the squares wrong side to wrong side. Stitch the same way a above but when you are through putting the two squares together you will have to weave the tails back through to the wrong side and anchor. This method puts a small ridge between the squares that looks quite pretty on certain afghan patterns. Its entirely up to you which way your prefer.
My last tip is ALWAYS weave you yarn ends as you stitch the squares together. If you don't and wait until the whole afghan is stitched together you will have thousands of little ends to go back and weave through! There are many "finished" afghans sitting on closet shelves because the ends need weaving in. Its just so much easier to weave them in as you go.
Happy Crocheting (and weaving)
Lynn
By Lynn Wolfe
http://www.simplyfromtheheart.weebly.com
http://www.simplyfromtheheart.etsy.com
What Does "Blocking" Mean At The End Of My Crochet Pattern?
In the home crocheting world, home knitting world, and cross-stitch world, you seem to hear about blocking a lot.
Yet, most people don't understand the term. Some patterns even tell you that it very important to block the finished crochet project to complete the item!
In fact, matters about blocking are very common questions, and while some people try to answer it, they just shake their heads and say they don't understand why this is necessary! Are you one of those people?
In most cases, blocking helps to retain the shape of the completed home crocheted garment. This process (blocking) is a onetime event and insures that the garment will retain its shape for the length of the garment.
Here's another problem to face if you are thinking about blocking your finished project - you need an electric iron. Most households don't own such a thing, or others say they have never used it and don't know how to use the simple iron! Well, if you want to block your home crocheted projects, maybe it's time to learn how to use that electric iron taking up space in your cupboard.
Okay, so some of us have blocked some home crocheted sweater before, but made a mess of the sleeves that are attached with ribbing - so what was the purpose of blocking? I really can't say as I blame you because blocking directions aren't complete most of the time and more importantly, they don't explain themselves very well in most cases.
Unfortunately, the first time I home-crocheted a sweater and tried to block it (which I found successful, except for one area), I also blocked the ribbing at the wrist area. All this did was to stretch the ribbing so that the ribbing was too large for my wrist size!
I learned from that experience. Now, I never block ribbing on a home-crocheted item.
But you may be asking yourself, why do you need ribbing on a crocheted sweater and how do you get the ribbing there?
I attach the ribbing with a sewing machine once I have finished crocheting the sweater. This is a common practice and used by many people. It seems to give a finished look to the sweater so that the home-crocheted sweater can be worn for any occasion.
I sometimes attach ribbing to the bottom of the finished sweater, and believe me; it doesn't look out-of-place. In fact, it looks like it should be there and would look funny without it.
You have to be an experienced home-crocheter to be able to do the above. You also have to be an experienced home-sewer to finish the garment to your satisfaction (if you are as picky as I personally am)!
If your crocheted garment is made with the right tension and laundered correctly, you should never have to block this garment more than once.
Blocking does have its advantages.
Soon, you will be thinking that blocking is nothing - just another step in finishing that crocheted garment!
This should ease your mind somewhat about "blocking". No, it's not a carpenter's term in this case, but it is essential to the look of the finished garment in the home crocheting world and adds to the look and feel of the garment.
There is a wealth of information to be found at http://learningeasycrochet.com.
Not only is there information, but it supplies encouragement as well.
When you get stuck, as we all do sometimes, leave a question in the comment box and you will get an answer within 24 hours.
When you sign up for a membership, you will receive a crochet pattern of your choice along with the help you may need to complete that project!
In the members area, you will shown "how to" and much more along with tips and tricks to speed up your progress.
Check it out today!
Friday, December 30, 2011
Creating Doll Crochet Patterns For Your Business
Free crochet doll patterns and free doll clothes patterns are what many people are looking for online. They are fun to make up and great to share. The patterns are also a very good seller for your home-based business. I have two daughters and three granddaughters, so there is always a need for new doll clothes.
Because one of my granddaughters collects Cabbage Patch Dolls these patterns became of great interest to me. So I got busy last year and made her an entire new wardrobe for one of those dolls. She was delighted with the sweaters, hats, slippers and blankets.
In the process I made up some new crochet patterns. She was thrilled with her Christmas presents and it gave me another avenue to think about selling. It was very easy on my budget and I developed some great new patterns for a new book.
With the dolls crochet patterns you don't have to be fancy. You can use colors and designs for many changes. I like to make up sweaters and hats the best but booties and blankets are fun too.
Doing the Paper Work
We all have our own way of keeping notes so I will give a quick overall of how I write my patterns. You must develop your pattern and have it typed up in clear directions. Take some pictures and place them throughout your directions. I find people really appreciate this extra touch. Again this doesn't have to be fancy just make your pictures clear and the directions easy to follow. Don't just scribble because you do want it to look professional.
Now if you have a scanner, some of the time you can place the item itself, in the scanner and scan straight from the item. It's all according to the size and color of the item and how good your scanner is.
When you are selling your patterns at stores or craft fairs, be sure to take some completed items and the directions. This is very good for when you go to your shows and bazaars. Many people who go to these shows are not just shopping for a product. They also crochet and will be looking to buy the patterns.
Flea markets and Yard Sale Finds
I found some 18 inch dolls and Cabbage Patch Dolls at the flea markets and yard sales for only a couple of dollars each. I took them home and cleaned them up. I now use them to model my latest doll fashions for the patterns.
Selling patterns is nice because once you create the pattern all the hard work is really done. You can now just sell and resell the same pattern.
Some of the most popular dolls would be the American Girl Doll or 18 inch doll, the Cabbage Patch Dolls and the Barbie Doll or any fashion dolls.
Linda Spangenburg draws on 35 years from her knitting and crochet business experience, both as a teacher and craft business owner. She is the author behind "Looney for Looms" where you will find patterns for loom knitting. We hope you found the information here inspiring enough to try a craft homebased business? You can find more free information about knitting and crochet for profit at http://www.knitting-n-crochet.com
Thursday, December 29, 2011
A blooming crazy quilt

Stamped Cookie Tree Centerpiece for Fall

Wednesday, December 28, 2011
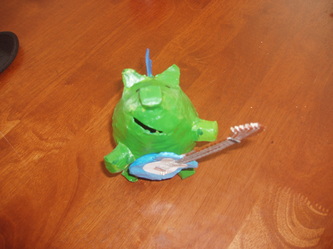
How to make super cute recycled pigs that rock
Tuesday, December 27, 2011
Tutorial: Wristlet keychain in less than an hour

[photo from Whimsical Mermaid]
You may also like...Giveaway: Shrine Kit

Retro Cafe Art is giving away a cool shrine kit on their blog. Click here to enter, hurry contest ends 11/13.
-Heather
You may also like...Monday, December 26, 2011
Penmanship Gift Tags

Tutorial: Faux Fur Pull-Thru Scarf and Cuffed Gloves

[photo from Sew4Home]
You may also like...Sunday, December 25, 2011
Thanksgiving Chair Covers- Kid-Friendly Craft

Saturday, December 24, 2011
How to Read a Crochet Pattern Like a Book
Patterns are one of the most important aspects of crochet. When following a pattern one of the most complicated aspects is following the abbreviations. It is extremely helpful if you can memorize the abbreviations. By doing this you will be able to be more efficient while still going at a faster pace. Here are some tips that will have you reading your patterns like a book in no time.
1. The patterns and instructions that you are following are commonly using rounds or rows. The pattern will indicate to you whether the pattern is designed to work in rounds, rows, or both.
2. Patterns and instructions also are typically ranked related to their difficulty. Common rankings are beginner, easy, intermediate, and advanced. You should always select a pattern that is well suited for your ability. As your skill level increases you can increase the difficulty level of the patterns you are selecting.
3. You should count the stitches you make as you go so that you are able to monitor that you use the required number of stitches necessary on each round or row.
4. You should always start verifying your gauge by crocheting a small 4 X 4 inch of the pattern as a sample. If this results in a larger size then what is on the pattern you probably need to switch to a smaller hook. If you find that the gauge is too small you probably need a larger hook.
As with anything when you actually start on your project pay special attention that you follow your instructions well. You want to be patient to ensure that you are creating quality work. All of your supplied should be laid out beforehand so that you are prepared and do not to think about anything other then reading your pattern and following instructions.
Of course there is a lot more to learn about crochet. Below you will find a link to a resource that will teach you how to crochet easily. Just remember that following patterns and instructions is essential and the more you practice the better you will become.
Learning to crochet does not have to be hard. Click here to read an honest review of a resource that will help you learn to crochet in no time.
Video tutorial: Grab-n-Go Quilted Pot Holder

[photo from Crafty Gemini]
You may also like...Friday, December 23, 2011
Fire Engine Cake and Hydrant Candy


Thursday, December 22, 2011
Ice Crystal Candles

Christmas Carnation Wreaths

Wednesday, December 21, 2011
Thanksgiving Candle Centerpiece Idea
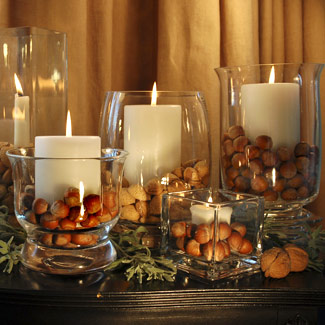
The white candles are quite elegant, but I might change it up with colored candles. Orange, brown, green and red would work well for autumn.
If you’re interested in more Thanksgiving centerpiece ideas, see Easy and Elegant Thanksgiving Centerpiece Ideas.
You may also like...Ten Insider Crocheting Tips
The lovely art of crocheting and knitting is regaining popularity. More and more women are interested in making crochet items with high quality yarns and threads. It is a pleasure for the experienced crocheter to create an item with different yarn textures and colors.
Here are some useful hints and directions to make crocheting easier.
There are two kinds of crochet patterns:
1. Patterns in the form of a diagram with a short explanation of the symbols that represent the stitches to be used. This kind of crochet pattern is often used in Europe.
2. Written crochet patterns that explain which stitches are to be completed as well as the order of the stitches. This are the patterns mainly used in the US.
Reading your Pattern:
It is important to understand the abbreviations used in the pattern. Memorizing the abbreviations helps you to become a faster and more efficient crocheter.
Ten crocheting tips:
1. Crochet patterns and instructions are worked in rounds or rows. It will be indicated on the pattern if you are working in rounds, rows or mixture of both.
2. All crochet designs begin with a "foundation chain". For a straight piece of crochet it is a long chain and for a project that starts with a circle it is a short chain. The small chain is closed with a "slip stitch". Do not make a "slip stitch" into the first stitch.
3. Crochet patterns and instructions are generally ranked according to difficulty level being advanced, intermediate, easy or beginner. Choose a pattern with a difficulty level that suits your abilities. Increase your level of difficulty as your skill advances.
4. Hold the hook and the yarn so that it is comfortable in your hands to allow the yarn to flow without restraint. To ensure the correct size of your work you need to maintain an even pressure when crocheting.
5. Count the stitches that you have made as you go on with your work to monitor the stitches needed on each round or row as required by the pattern.
6. Count the number of chains at the beginning of each row to ensure the correct height and length for the succeeding row. This "turning chain" establishes the first or "initial stitch" of the next row.
7. Make a sample of the pattern to get an indication of the size. When the size of the sample turns out larger than indicated on the pattern use a smaller hook and when the size is smaller use a larger hook.
8. Pick up two loops from the previous row of the stitch at all times except when the pattern indicates to pick up either the back or the front loop.
9. A "space" is described as the interval between stitches.
10. On completion of your work, pull through a "loop on hook" one last time and cut the yarn and pull the end through.
When you actually start a crochet project make sure that you follow the instructions as they are printed. Prepare your devices beforehand to ensure the smooth flow of your crocheting.
For more crochet stitches, crochet patterns and other crochet resources by Janna Halioris visit http://www.topcrocheting.com
Tuesday, December 20, 2011
10 Rules to follow when you choose your first Crochet Pattern
Learn how to hook takes great patience and practice, and can be frustrating at first. Many people abandon everything simply because they did not know where to begin. Either they start with the wrong kind of pattern, wire, or hook size, without realizing the importance of choosing the right supplies.
It is very important that everyone starts with the right hook patterns and supplies; otherwise, they you just give up. But, with the right help and tools, anyone can master the hook. This includes boys and girls and men and women. Yes men can crochet too!
Here are 10 rules that you should follow when deciding on your first boss of hook. I recommend that you follow them, because they you will save a lot of frustration.
1 Use a hook of 5.00 mm or rain. With the help of a small hook will make it harder for the thread to remain on the hook, while being pulled through the loop. This will cause only frustration.
2 Avoid patterns that require the son who is more difficult to work with as, loop and eyelashes. Just stick with a simple and easy to work with wire.
3 Stick with beginner patterns. Even though they may be projects that you did not interested all that; You will be grateful later if you stick with something simple.
4. Start with small projects and work your way up.
5. Always use a model and follow all the instructions.
6. Use the wire and hook size indicated by the pattern.
7. If the pattern provides you with a gauge, use it. It may seem like a waste of time, as it is, but you will be grateful in the end.
8. Take your time and your slow work keep loose mesh. This will help maintain consistent tension throughout the project.
9 Hook at least once a day.
10. To be patient. Always complete a project before moving on to the next. (This is the most difficult to follow rule, but it is good practice till you get the freezing it).
You are now ready to go out and supplies for your first project hook. Your local shop of crafts or the son should have everything that you need to start. If this is not the case, you can always click here to view some of my favorites to Amazon.
Remember that your first couple of projects is perfect. Your blood pressure will be not the same line to line and this will cause your project to look at désaxées. It is normal for all those who are, so don't worry and keep practising.
Practice makes perfect.
Monday, December 19, 2011
Turkey Tootsie Pops

Sunday, December 18, 2011
Number Shelf

Turkey S’mores Pops

Saturday, December 17, 2011
Experience the Excitement of Modular Crochet
Modular crochet, better known as "THE GRANNY SQUARE TECHNIQUE", is as popular as ever. In fact, the granny square pattern has been around for so many years and yet it's never gone out of style. It's a classic.
Crocheting modules in one specific pattern and then sewing them all together to form a larger piece of fabric - like an afghan - is a very practical method of crochet. The modules are portable and the project can be worked on anywhere. There's no need to carry around the entire project, just a hook and enough yarn to make a module or two at a time. Plus, it's easier to learn one particular crochet pattern and keep repeating it as many times as needed.
From the design point of view, multiple modules assembled together results in a very striking overall pattern. Color choice is key to creating an exciting modular crochet finished product. While bright color yarns are often used, any of the modular crochet patterns can look stunning when worked in shades of neutrals or earth tones - like beiges, greys, browns - to achieve an elegant, eclectic look that blends well with sofas and other furnishing colors popular today. It's also possible to crochet the very same patterns in baby colors and in much finer yarn, like sport-weight or baby-weight, to create beautiful and unusual baby gifts.
The square referred to as " the granny square" is made up of "rounds" , with each round usually done in a different color yarn. A very simple stitch pattern is used, made up of 3-stitch units. When we refer to modular crochet, however, we also mean a great assortment of eye-catching crochet patterns, some having flowers in the centers, some with very intricate multi-dimensional stitches, like the "popcorn", the "cluster" and the "puff" stitch, or even lacy textures. Some modules are not square at all, but triangular, rectangular, hexagonal, octagonal, or round. Strips crocheted separately and then sewn together into afghans and throws can also be considered modular crochet.
There is a huge variety of modular crochet patterns in existence today, and many books and Internet sites offer instructions. Just enter "granny square" or "patchwork crochet" in an Internet search engine. It's even more exciting to request an "Image" search within "Google" and view the beautiful, colorful, and inspiring photos of completed projects done in this technique.
To guarantee success with this crochet technique, it's a good idea to learn modular crochet patterns visually - through illustrations, photos, or videos. This is important because traditional crochet instructions are often hard to follow, since they are written in an abbreviated "crochet shorthand". Illustrated crochet patterns are definitely great, especially for beginners. Intermediate and experienced crocheters are also helped by step by step stitch diagrams. Complicated stitches are much easier to learn that way.
The technique of modular crocheting has endless possibilities. It can be used for making afghans, baby blankets, baby outfits, scarves, hats, bags, and countless other wearables and home accessories. It's an exciting crochet method that provides many opportunities for creativity, relaxation, and personal satisfaction.
Author of this article - Bella Scharf - is the creator of the crochet website at http://www.PatchworkCrochet.com/
The site offers a collection of fully illustrated crochet patterns. Bella Scharf was design director at a major yarn company for many years, and has authored two craft books. The first - Illustrated Patchwork Crochet - was a best-seller, with over 150,000 copies sold. It was also a Literary Guild Alternate, and was featured by Doubleday Book Club.
Friday, December 16, 2011
Turkey Day Centerpiece

Thursday, December 15, 2011
Freebie: Sweet Shop pillow pattern

Image credit: Sewing under Rainbow
You may also like...Tutorial: Gift Box quilt block

Image credit: Live Journal
You may also like...Wednesday, December 14, 2011
It’s new: Shwin & Shwin sells patterns now

[photo from Shwin & Shwin]
You may also like...Giveaway: Best Fat Quarter Quilts etc

Tuesday, December 13, 2011
Make a Tom Turkey Towel

Knitting Patterns - Finding Free Knitting Patterns Online
You can find free knitting patterns online with a quick search on any of the search engines. But if you are searching for knitting patterns, is this really the best way to get it done? A lot of that depends on what kind of knitting or crochet patterns you are looking for online as well as what you plan to do with them once you have them. You see; not all knitting and crochet patterns are created equal.
While that may not make sense if you are new to the world of knitting, it is still true. If you are doing professional knitting to earn money, it becomes even more important. There are going to be different restrictions with the patterns that you find online and that is especially true when you find free knitting and crochet patterns. There is a small caveat or catch with even the most obscure knitting patterns. Unless the patterns themselves were made before 1923, they are going to be covered by a copyright.
If you are just going to be finding free knitting and crochet patterns online for your own personal use, this may not be an issue for you personally. However, if you are selling or even giving away the finished knitted products, you may find yourself in need of some confirmation about exactly what is and is not allowed. Fortunately, there are some great knitting resources available online and finding a website about knitting can benefit you greatly for both the copyright information about the knitting patterns and helping you to find free knitting or crochet patterns online.
Many of the knitting and crochet patterns you find online will be clearly marked about what you can and cannot do but even more of them will not. A very large portion of the free knitting patterns online are offered by other people just like you who have spent their time, energy and effort to create those patterns. More often than not, they are willing to share those patterns with you in hopes of getting more well known. Often times they will share their knitting patterns for free simply out of a pure love for the craft of knitting itself.
One of the easiest ways to find free knitting or crochet patterns online that you can use for any purpose is to find a knitting website that has a number of resources as well as an active group of readers. Here, you will probably be able to meet a lot of the people who create those knitting patterns right their on the website, have conversations with them and know if there are any limitations before you ever even see the pattern itself. If there are, you already know and if there are not, you are free to use the knitting pattern any way that you want.
Finding a knitting community online has many benefits above and beyond just being able to find free knitting or crochet patterns. The fellowship alone can be invaluable when it comes to your arts and crafts. If you appreciate sharing not only knitting patterns, but hints, tips and even encouragement and friendship among like-minded people, then a knitting community can be just the ticket you have been looking for. The free knitting patterns online should just be an added bonus... icing on the knitted cake so to speak.
Liz Raad is the author of the exciting new E-book "Knitting For Profit" and she also runs a popular blog on the topic of making money from knitting and crochet. Visit her blog at http://www.knittingforprofit.com/blog where you will find tonnes of free information and practical advice about how to successfully knit or crochet for profit.
On her blog you will discover: How to get started in your own knitting business, how to easily sell your knitting and crochet online, copyright free knitting patterns that you are free to knit for your own profit, real success stories and interviews with women who make cash from knitting, advice on making money with knitting websites
Monday, December 12, 2011
Guides in the choice of good vintage Crochet Pattern collection
Hook is a pastime old age. It dates back to the 16th century and that the time passes, these vintage patterns have evolved. You can do many things in the hook. Jackets, shawls, hats, handbags and other patterns as well.
Some enthusiasts prefer looking for vintage hook collections because it is a possession prized for them. There are many resources that you'll find savings stores, antique shops and boutiques.
In the 19th century, people rely only on their own sources, which in turn, they make their own clothes and other settings for their home. At this time, only the rich and famous people can buy some products good hook.
Today, hook collection vintage enthusiasts can enjoy and afford different types of patterns and hook collection.
Here are a few techniques in the COLLECTIONS of hook's VINTAGE:
First thing to do is to prepare the materials for a hook. The most important equipment for use in the hook is the hook hook. There are different types and sizes of hooks. You also need to wire or thread, measuring tape and patterns of card board or cut outs.
Start the hook with a loop of landslide on the hook node. Draw an another loop the loop 1 and then start the process to come with a string of appropriate length. Then the string, and is done in rows or it can be attached beginning of the line with a mesh of landslide and is once again in tours.
The mesh is done by one or more loops in each loop of the traction chain. The end of the mesh translates a single loop that is left to the hook.
Another technique of vintage hook is the hook vintage mat. This technique involves complex work of lace that uses subtle threads. It uses the hook thread, preferably cotton or nylon that is readily available in coils to any craft stores. For a look more vintage, you can use thread of white or cream in colour.
Vintage placemats have different sizes, designs, shapes, and even the material that you may also use various types.
Vintage Cricetus baby can also be made. Range of the design or thread thread patterns. These vintage Cricetus were patterns of mothers who keep and probably children inherited and then transmitted to the new generation of the family.
Find a vintage hook to you or only for a hobby, this is not an easy task. You can find these vintage collections in the houses of the members of your family. Scour or search the basement of your grandmother or your aunt for these collections rare hook.
Don't forget to find available on Cricetus vintage online sites. There is a very wide selection allows you to choose among the rarest and best collection. Sites such as eBay, Amazon.com, Google.com can be a help in your research.
Savings shops are abundant with this type of collection. Because some people are not aware of these items, they only sell to shops of savings. So take it to your advantage in the search for the collections and hook vintage techniques.
You want to learn more vintage hook for your next boss hook coming? Here you can get thousands of vintage crochet pattern collection. [http://www.vintagecrochetcollection.com/Vintage-Crochet-Patterns]
Grab a cuppa: Sew Modern Monday Link-up

Image credit: Canoe Ridge Creations
You may also like...Sunday, December 11, 2011
Tutoral: Small ID wallet with snap closure

[photo from All Wrapped Up]
You may also like...Saturday, December 10, 2011
Penguin Cupcakes

Tutorial: From boxy blazer to custom fit jacket

[photo from Cotton & Curl]
You may also like...Friday, December 9, 2011
Burlap Advent Calendar

Charming and Jolly Santa

The chart is free from Atelier Colorido.
You may also like...Thursday, December 8, 2011
Food Gifts and Packaging Ideas

Wednesday, December 7, 2011
How to Crochet - The Basic Stitches
Learning how to crochet is easy and a few basic stitches can be used to create more
complicated patterns.
Crochet is, by using a hook, the pulling of loops of yarn through other loops to create pieces of goods used for wearing apparel and for household items. The first published references to crochet were in the 1800s. Today there are many free crochet patterns available, along with instructions for learning the basic stitches, for those who are wanting to learn how to crochet.
With the invention of the cotton gin in the 1800s, crochet replaced more costly methods of lace making. Crocheted laces in the Edwardian period were elaborate with complicated stitching. White thread became common, replacing strong colors that were used earlier in the Victorian era. After WW1, there were less patterns produced for crochet, but after WWII, new patterns were produced, there were thicker threads and yarns, and there was a renewed interest in learning how to crochet. Today's yarns with new textures and wonderful colors have added to the popularity. There are many free crochet patterns online.
Although different pattern types are used for crochet projects, there are only a few basic crochet stitches to know when learning how to crochet as the interesting patterns are worked with combinations of these few stitches.
To form more complex patterns, these are basic stitches to learn:
US - The Stitch - The Abbreviation
Chain - ch
Single Crochet - sc
Half Double Crochet - hdc
Double Crochet - dc
Slip Stitch - slst
also - the Treble and Triple Treble
Different terminology is used in different countries. Some of the names of the stitches differ between American English - US - and British English - UK.
A few of the many patterns which are made using these basic stitches are the shell stitch and the picot, commonly used for edgings, the different cluster stitches, and the popcorn stitch. The instructions for forming these and many, many more complex patterns are generally included in the crochet pattern instructions.
For free online videos for basic stitches and for free crochet patterns online, Go Here.
Tuesday, December 6, 2011
It’s new: Stitch Social discounts for sewers

It’s called Stitch Social, and each day they offer one sewing-related item for a deep discount. Just like Groupon and Living Social, you can subscribe to their site so you get an email with each day’s discount. Oh my! This could be dangerous to my pocketbook. Go to Stitch Social to learn more.
[image from Stitch Social]
You may also like...Holding a Grudge

Get the free chart – another great one from Kell Smurthwaite.
You may also like...Monday, December 5, 2011
Disney Princess Cupcakes

Sunday, December 4, 2011
Crochet Patterns: Where to find
Hook is a wonderfully relaxing activity that is to be appreciated by many people, especially women. You can create many things with hook - bags, wallets, purses, cell phone holders, laptop sleeves and even curtains! You can use the usual mesh, but to make your most interesting creation, you can also use hook different patterns. There are many of them you can choose from.
If you are looking for a pattern of hook for something that you plan to do, there are many sources where you can get ideas from. Let me tell you all about them
Crochet Patterns online
There are many Web sites that you can go to hook on habits. The Internet is a great place where you can get many ideas involving hook patterns. You may also order your equipment for hook online if you want!
Buy a book
You do not need a book dear, new to tell you all about hook. We all know that the hook is a boat which has been practised for many years. Your grandmother knows surely how hook and perhaps even your grandma grandmother too! Any old book on hook can be purchased in stores of discount book. You may even discover the local library.
As your grandmother.
I am serious! Your grandmother may be the best person to teach you how to create new and beautiful crochet patterns. In this way, you would be also able to ask him to review your points of suture, if it needs any improvement.
Once you have established the kind of design that you can go with your creation, you can begin to do next as soon as possible. Hook is a wonderful hobby that you can, or watching television while speaking to your friends, have a cup of tea. The process is fairly repetitive, and really not need great mental activity while making the task.
To start, here are some points of suture popular hook.
Base stitch - you would probably already know how to make a basic crochet stitch. If you do not have time to teach you. These base mesh are important to you would be starting and ending any patter with a base mesh.
Cluster stitch - this type of stitch is very interesting and has a wonderful texture. It is pleasant to watch, especially when you use several colors.
Stitch - lace, now it is something wonderful to. This type of mesh mimics the appearance of lace-like patterns with holes. With the help of a band of white turnover, you could easily get rid of lace look. It would be great as a lining to curtains and ready a feminine feeling to almost anything.
Other that the hook, knitting is also another activity which benefit many people. Contrary hook, knitting is faster because it has larger knitting stitches. You can make scarves, sweaters and much more thanks to knitting.
Thus, restart a new pastime now! Look look up crochet or knit on the Internet. I am sure you will find many sources it.
Find more information about the patterns crochet and knitting stitches.
Saturday, December 3, 2011
Crochet Stitches - The Linguistics of Crochet
Crochet stitches are the linguistics of crochet. They are the very essence of the crochet craft and as such are deservedly got their own special "abbreviations" and quirks.
Purpose of Crochet stitches
Crochet stitches and crochet patterns are the blueprint to any crochet project. Just like sewing patterns and instructions are to a seamstress. You need to think of crochet stitches and patterns as you would think about ingredients and recipes.
Like a good recipes, good crochet patterns tell you what materials and crochet stitches you are going to need to complete the crochet project. The just like a good recipe the crochet pattern will tell you in a step by step pattern which type and how many crochet stitches are needed.
How a typical crochet pattern looks
This is an extract of what a basic crochet pattern looks and how the stitches are described.
Did you notice the ch and dc these are the crochet stitch abbreviations. Saves repeating it longhand in the pattern; especially if it is a hand written pattern.
You will needDouble knitting yarn / 4 mm Crochet hook
Stitches used
Chain ch / Slip stitch sl st / double crochet dc (UK) Single crochet sc (USA)
Starting at the top (Head)
Start with a slip knot on your hook
Make 4 ch and slip stitch into the first chain to form a circle
1. Make 1 chain and work 10 dc into the ring ending with a slip stitch into the first stitch.
2. Make 1 chain and then increase by working (1dc into the first &2dc into the next stitch) repeat this all round finishing with a slip stitch into the first stitch.
The crochet stitches abbreviations
Chain - ch
Single crochet - sc
Double crochet - dc
Slip stitch - sl st
Half double crochet - hdc
And so on ...
More Abbreviations
Crochet instructions are also abbreviated ... just to make life interesting
Increase - inc
Decrease - dec
Yarn over - yo
Yarn over hook - yoh
So there you have it ... crochet stitches are the linguistics of the crochet craft. One little twist there is a difference in the crochet stitches names in America and Britain ... what a surprise.
For the next installment of Crochet Stitches visit http://www.CraftMastery.com
Review and giveaway: Color, Texture & Casting for Jewelers

I am so excited about this new book from Lark Jewelry & Beading! Color, Texture & Casting for Jewelers: Hands-On Demonstrations & Practical Applications is titillating with all the exciting things happening on the surface of these pieces. Inside this gem of a book you’ll find bold color, tactile surfaces, and unique fabrications along with clear instructions for how to recreate the techniques. This two-part book by Carles Codina first covers color, texture, and finishes. Modeling and casting round out the second half. With instruction and beautiful photography to guide you, this book will acquaint you with ancient techniques such as keum boo, mokume gane, granulation, and plating. Although the techniques have been in use since ancient times, the pieces featured in this book are anything but old-fashioned. The contemporary design juxtaposed with these ancient techniques is truly spectacular.
Are you excited about this book as I am now? Enter for a chance to win a free copy! Simply leave a comment for your chance to win — and don’t forget to tell your friends. The giveaway will end November 23, 2011. Sorry, open to US residents only.
You may also like... Have you entered all our giveaways?Friday, December 2, 2011
The Lovely Craft Of Crochet Really Is Fun And Easy To Learn
Crochet Is Fun and Easy to Learn
Crochet is a very popular handicraft that has been around for many years. It is done with a crochet hook and yarn. The yarn is caught by the hook and pulled through loops. With just a few basic crochet stitches many beautiful things can be created.
There are millions of crochet patterns to choose from. They range in difficulty from very easy for new beginners to incredibly complex for people who have been crocheting for many years. It's easy to find patterns almost anywhere from the Internet to bookstores.
There are a number of tips that can be found to help everyone from the newest beginner to the polished pro. The most basic thing to remember is that all stitches are based on just one stitch. One you learn that stitch you are well on your learning how to follow the most complex of patterns.
The way to get these tips is to find a book that tells you all the secrets of crochet and makes it easy for people to learn and for experiences crocheters to get even better.
Another tip that you could find in a book like that is about learning how to keep tension in your work and how important tension really is. Tension is how tight you hold the yarn and how smoothly it flows into your work. The reason that tension is so important to your crochet stitches is that it is the biggest thing in determining how loose your stitches are. The less tension the bulkier the yarn is when your hook grabs it. Bulky yarn means bulky and loose stitches which don't look as polished. Keeping the tension tighter keeps the yarn thinner and makes your stitches tighter and smaller. This leaves you with a very smooth finished product.
But neater and tighter crochet stitches aren't the only reason to keep good tension. When you are working on learning how to read crochet patterns you will see that there is a line that reads there should be a certain amount of stitches and rows in a certain amount of space. That might not seem all that important, but making that practice swatch makes you work on getting the right tension. If you don't get your stitches just right then your project won't fit the dimensions of the pattern, and won't look right.
One of the greatest tips in crochet is how to read crochet patterns. Just like with most other hobbies you will find that crochet has its own language. Trying to learn how to read patterns and understand terms like YO, HDC, TC, SC and others can be just like trying to learn Greek. But, with the right book to help you learn you will understand that HDC, TC, and SC stand for different crochet stitches.
Every day there are people who are trying to learn how to crochet. Some of those people get frustrated and give up almost immediately, especially after they look at crochet patterns. But crochet is fun and easy, once you know all the right tricks. You can make beautiful clothes and blankets, things that will become treasured gifts and even family heirlooms. All it takes to get started is learning how to make that very first crochet stitch.
This article created by Ian Moffat to help to promote the lovely age-old craft/hobby of crocheting for those starting out as well as those who are quite professional crocheters. For more information visit his website:-
http://www.crochetedstitches.com
Ping Pong Ball and Handkerchief Fish tutorial

Abigail of “While she naps” has a delightful tutorial on how to make a Handkerchief Fish with felt embellishments. She uses Ping Pong Balls for the fish’s head and then uses pieces of felt for a delightful face and fins. A bag of six Ping Pong Balls for a dollar was her inspiration. Don’t forget that Abigail is the author of “The Artful Bird: Feathered Friends to Make and Sew” that I gave away some time back in a book giveaway here. It is a wonderful book for your favorite crafter as a holiday gift.
You may also like...Thursday, December 1, 2011
White Caramel Inspiration Board

I was literally unwrapping a caramel to eat when I came across this beautiful inspiration board at Postcards & Pretties! I love the neutral yet dreamy feel of this lovely color combination.
Pin It
You may also like...Ideas for Leftover Halloween Candy

Pin It